Chrome Silently Shipped the Biggest Web API for AI Agents: What Changed in WebMCP
Since I wrote WebMCP for Beginners, Chrome has moved the WebMCP specification into an official Origin Trial starting in Chrome 149. The early preview posts did not include the final API details, and several interfaces have changed since then. Instead of repeating the basics of MCP, this post will discuss the recent changes in WebMCP and how to use the updated APIs in the browser.
First steps
When an AI agent interacts with a standard web page, it usually relies on actuation (scraping the DOM and simulating clicks or keystrokes). WebMCP replaces this guesswork by letting the page register structured tools with JSON Schemas. The diagram below shows the difference between DOM actuation and the WebMCP contract.
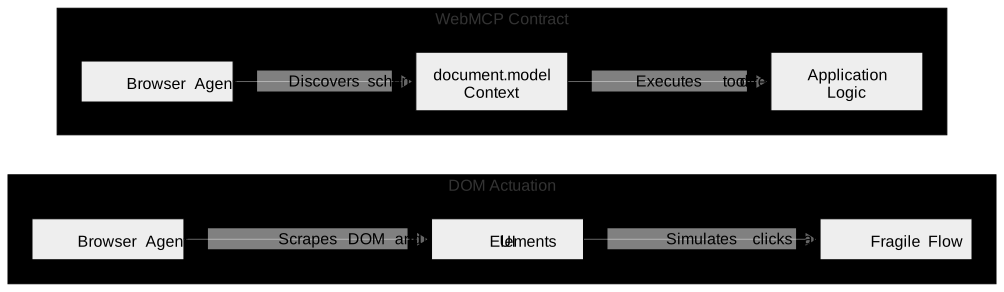
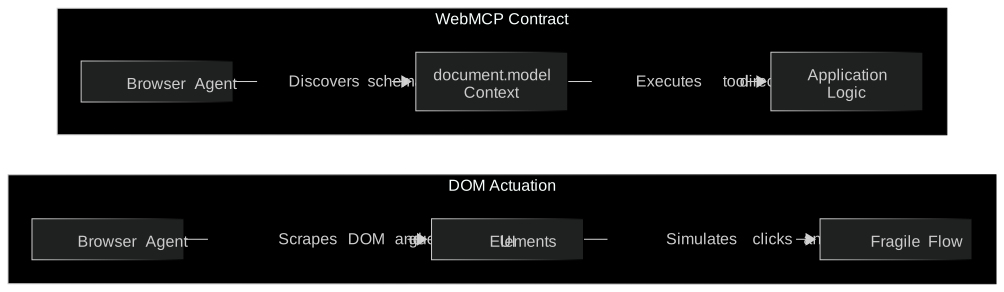
Earlier drafts exposed WebMCP on navigator.modelContext along with bulk methods like provideContext() and clearContext(). Those methods have been removed from the specification. You now access WebMCP directly through document.modelContext in secure contexts (HTTPS or localhost).
Because the API lives on the Document object, registered tools are bound to the lifetime of the current page. When the user navigates away or closes the tab, the browser cleans up the registered tools automatically.
To test WebMCP locally in Chrome without an Origin Trial token, enable the testing flag first. Open chrome://flags/#enable-webmcp-testing in your browser, set it to Enabled, and relaunch Chrome. Then, check for support in your script as shown below.
if ("modelContext" in document) {
  console.log("WebMCP is supported in this document");
}
Registering tools using the imperative API
The imperative API lets you register and manage tools in JavaScript using document.modelContext. It provides three asynchronous methods: registerTool(), getTools(), and executeTool(). You can pass an AbortSignal to registerTool() to unregister a tool when a UI component unmounts. As of Chrome 153, aborting the registration signal removes the tool without breaking executions that are already running.
Always pass a plain JavaScript object when calling executeTool(tool, inputObject). Passing JSON-stringified input arguments was deprecated in Chrome 155. Inside your tool’s execute callback, return a string or any JSON-serializable value directly, and use the second { signal } argument to handle cancellation.
const controller = new AbortController();

await document.modelContext.registerTool(
  {
    name: "search_flights",
    title: "Search Flights",
    description: "Search available flights between two airports within a budget.",
    inputSchema: {
      type: "object",
      properties: {
        from: { type: "string", description: "3-letter IATA origin code (e.g., SFO)" },
        to: { type: "string", description: "3-letter IATA destination code (e.g., HND)" },
        maxPrice: { type: "number", description: "Maximum ticket price in USD" }
      },
      required: ["from", "to"]
    },
    annotations: {
      readOnlyHint: true,
      consequentialHint: false
    },
    execute: async ({ from, to, maxPrice }, { signal }) => {
      const response = await fetch(`/api/flights?from=${from}&to=${to}`, { signal });
      const flights = await response.json();
      return flights.filter((f) => !maxPrice || f.price <= maxPrice);
    }
  },
  { signal: controller.signal }
);

// Call controller.abort() when the component unmounts to unregister the tool.
Using safety annotations
You can also pass an annotations object when registering a tool to describe its side effects to the browser and the agent. Always set readOnlyHint: true for tools that only read data and do not modify state. For actions with real-world or irreversible results (such as booking a ticket or deleting data), set consequentialHint: true so the browser or agent can prompt the user for confirmation first.
If a tool returns third-party or user-generated text (such as customer reviews), set untrustedContentHint: true to warn the agent against prompt injection. Chrome 156 also added debugging: true to mark internal inspection tools so end-user agents can ignore them.
Using the declarative form API
The declarative API lets you turn existing HTML <form> elements into WebMCP tools without writing registration code. To begin, add the toolname and tooldescription attributes to a <form> element. You can also add toolparamdescription to individual <input>, <select>, or <textarea> fields to describe each parameter in the generated schema.
By default, when an agent invokes a declarative form tool, the browser scrolls the form into view, fills the fields, and waits for the user to click the submit button. If you want the form to submit automatically without waiting for a click, add the toolautosubmit attribute to the form.
Handling form submission in JavaScript
In single-page applications, you can handle agent form submissions in JavaScript using SubmitEvent.agentInvoked and SubmitEvent.respondWith(). Check e.agentInvoked inside your submit listener to see if an agent triggered the submission. Once you compute the result, pass a Promise to e.respondWith() to send the structured output back to the agent, as shown in the example below.
<form
  toolname="check_flight_status"
  tooldescription="Look up live gate and delay status for a flight number"
  toolautosubmit
>
  <label for="flightCode">Flight number</label>
  <input
    id="flightCode"
    name="flightCode"
    toolparamdescription="Flight code such as SK-204"
    required
  />
  <button type="submit">Check status</button>
</form>

<script>
  document.querySelector("form").addEventListener("submit", (e) => {
    e.preventDefault();
    const status = lookupFlightStatus(new FormData(e.target).get("flightCode"));

    if (e.agentInvoked) {
      e.respondWith(Promise.resolve(status));
    }
  });
</script>
Chrome also applies CSS pseudo-classes while an agent interacts with a declarative form. You can style :tool-form-active on the <form> element and :tool-submit-active on the submit button to highlight active agent actions for the user.
form:tool-form-active {
  outline: 2px dashed cyan;
  outline-offset: 4px;
}
Listening to tool lifecycle events
document.modelContext inherits from EventTarget and dispatches events when tools change or run. Note that the older window.ontoolactivated and window.ontoolcancel handlers were removed in Chrome 156. Always attach your listeners directly to document.modelContext.
The browser fires toolchange whenever tools are registered or unregistered in the document. It fires toolactivated when an agent starts running a tool or fills a declarative form, and toolcancel when the user or agent cancels the execution. Both activation and cancellation events include the toolName property.
document.modelContext.addEventListener("toolactivated", (event) => {
  console.log("Agent activated tool:", event.toolName);
});

document.modelContext.addEventListener("toolcancel", (event) => {
  console.log("Tool execution cancelled:", event.toolName);
});
Sharing tools across iframes
By default, WebMCP only allows the top-level document and same-origin iframes to register or discover tools. Cross-origin iframes are blocked unless the parent page grants the tools Permissions Policy on the <iframe> element.
<iframe src="https://booking-widget.example.com" allow="tools"></iframe>Even after you add allow="tools", cross-origin tools remain private unless both frames opt in. First, the iframe must list the parent origin in the exposedTo option when calling registerTool(tool, { exposedTo: ["https://parent.example.com"] }). Next, the parent page must request that origin in getTools({ fromOrigins: ["https://booking-widget.example.com"] }).
How the AI agent connects to your tools
One common question is where the AI model and API keys live when using WebMCP. WebMCP (document.modelContext) does not bundle an LLM or store API keys on your website. Instead, your page only registers the tools and their JSON Schemas, while the agent client handles the model connection.
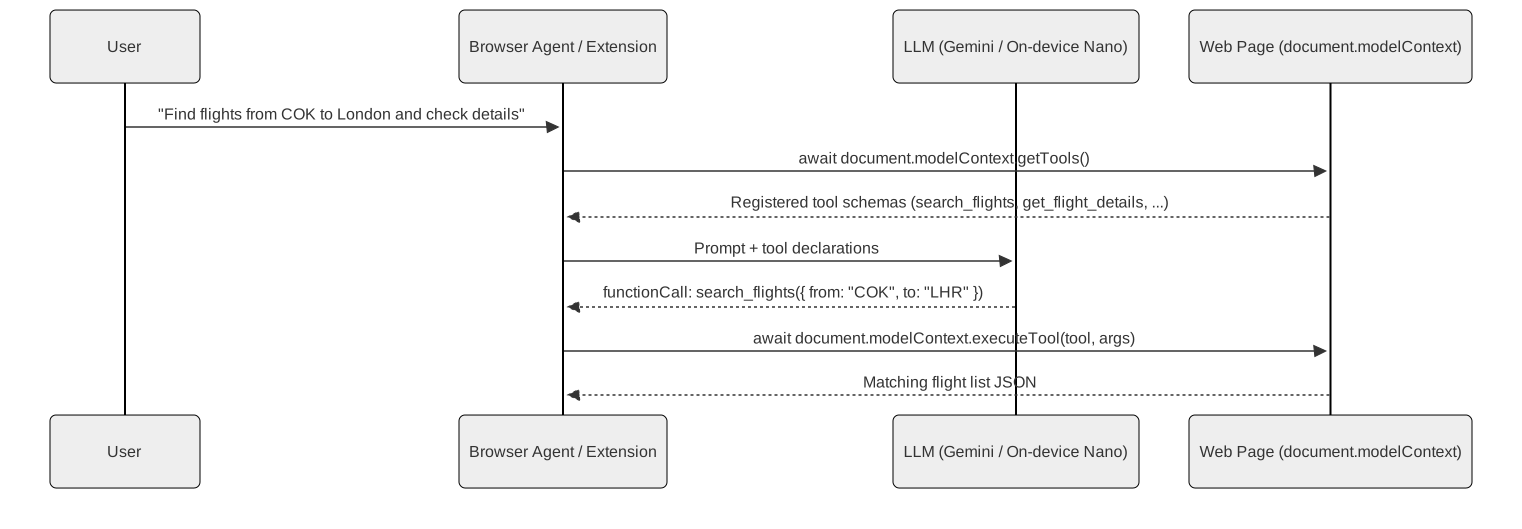
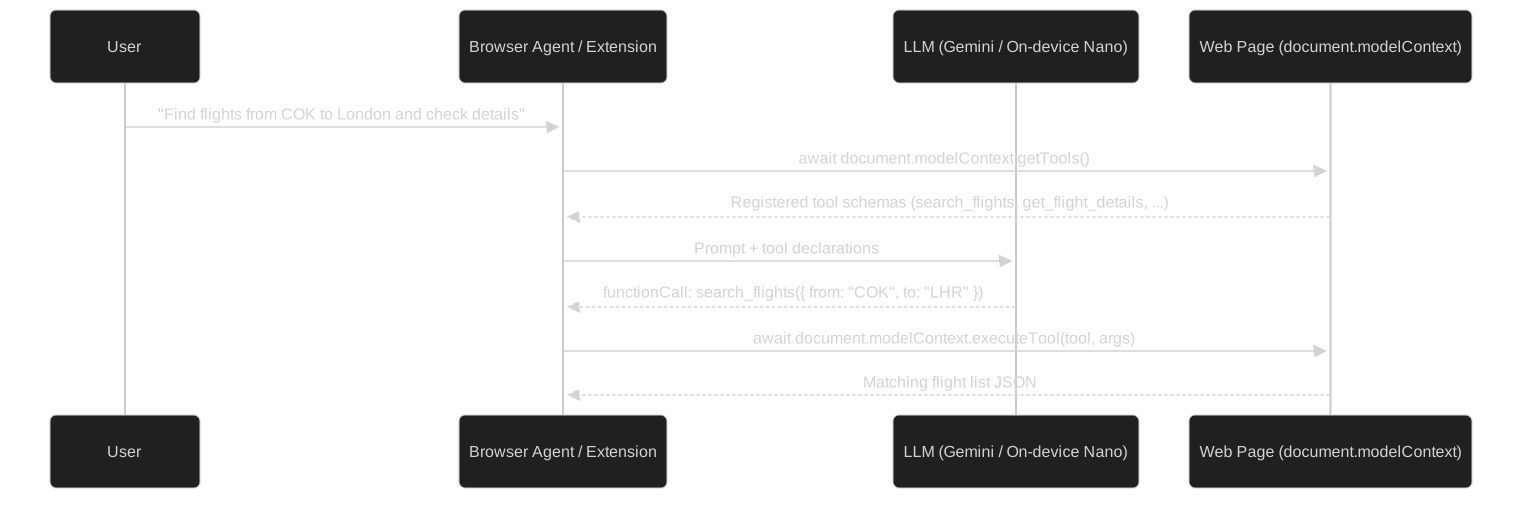
During development, you can connect an AI agent to document.modelContext in three ways.
First, you can install Chrome’s Model Context Tool Inspector Extension or the Example Agentic Extension. The extension uses a content script to call document.modelContext.getTools() on the active tab. You enter your Gemini API key inside the extension settings, and it sends your natural language prompts along with the page’s tool schemas to gemini-2.5-flash (or gemini-3.6-flash).
Second, you can use Chrome’s built-in on-device model through the Prompt API. Enable chrome://flags/#prompt-api-tool-use in Chrome to let the local LanguageModel API call your registered WebMCP tools directly on the device without an external API key.
Third, you can build an in-page agent chat bar that reads await document.modelContext.getTools(), passes those schemas as functionDeclarations to your own backend or LLM API, and runs await document.modelContext.executeTool() when the model responds with a tool call.
You can also test this in the flight booking demo
I built a flight booking simulator to test these updated WebMCP APIs in one place. You can open the demo using the link below.
👉 Open the WebMCP Flight Booking Demo
The demo registers four imperative tools (search_flights, get_flight_details, select_flight, and book_flight) and one declarative form tool (check_flight_status). You can type natural language requests like “Find flights from COK to London and show details for AI-149” using the built-in agent bar, or click AI Connection to paste a Gemini API key and test live gemini-2.5-flash tool calling. When you run book_flight, notice how consequentialHint: true pauses execution and opens a confirmation dialog before issuing the ticket.